If you’re running an LS engine, the factory rocker arm trunions are a ticking time bomb.
Not a matter of if. A matter of when.
The stock trunions use uncaptured needle bearings inside the rocker arm pivot. Under high RPM or upgraded valve springs, the outer shell of that bearing pack starts to walk out of the bore. Once it does, individual needle bearings fall out and scatter through the engine.
Into the oil. Through the pickup. Into everything.
If you’re lucky, you catch it early as a tapping sound and a low oil pressure light. If you’re not lucky, you’re pulling the motor.
Why the Factory Design Fails
GM’s stock LS rocker arms use a cageless needle bearing design at the trunion. Under normal driving with stock valve springs, they’ll usually survive. Usually.
But add any of the following and you’re on borrowed time:
- Aftermarket cam with more lift
- Stiffer valve springs
- Higher RPM usage (track days, autocross, spirited driving)
- Just plain age and mileage
The needle bearings aren’t retained by anything structural. They’re press-fit and rely on the housing staying put. Once there’s any wear or heat cycling, the housing walks, the needles drop, and your oil system becomes a needle bearing delivery service.
The telltale signs:
- Tapping or ticking noise from the valve covers
- Low oil pressure warning
- Tiny needle bearings stuck to your magnetic drain plug during an oil change
- A rocker arm that wiggles side-to-side on the trunion bolt
If you find needles in your oil, the rocker arm is done. But the real question is where those needles went downstream.
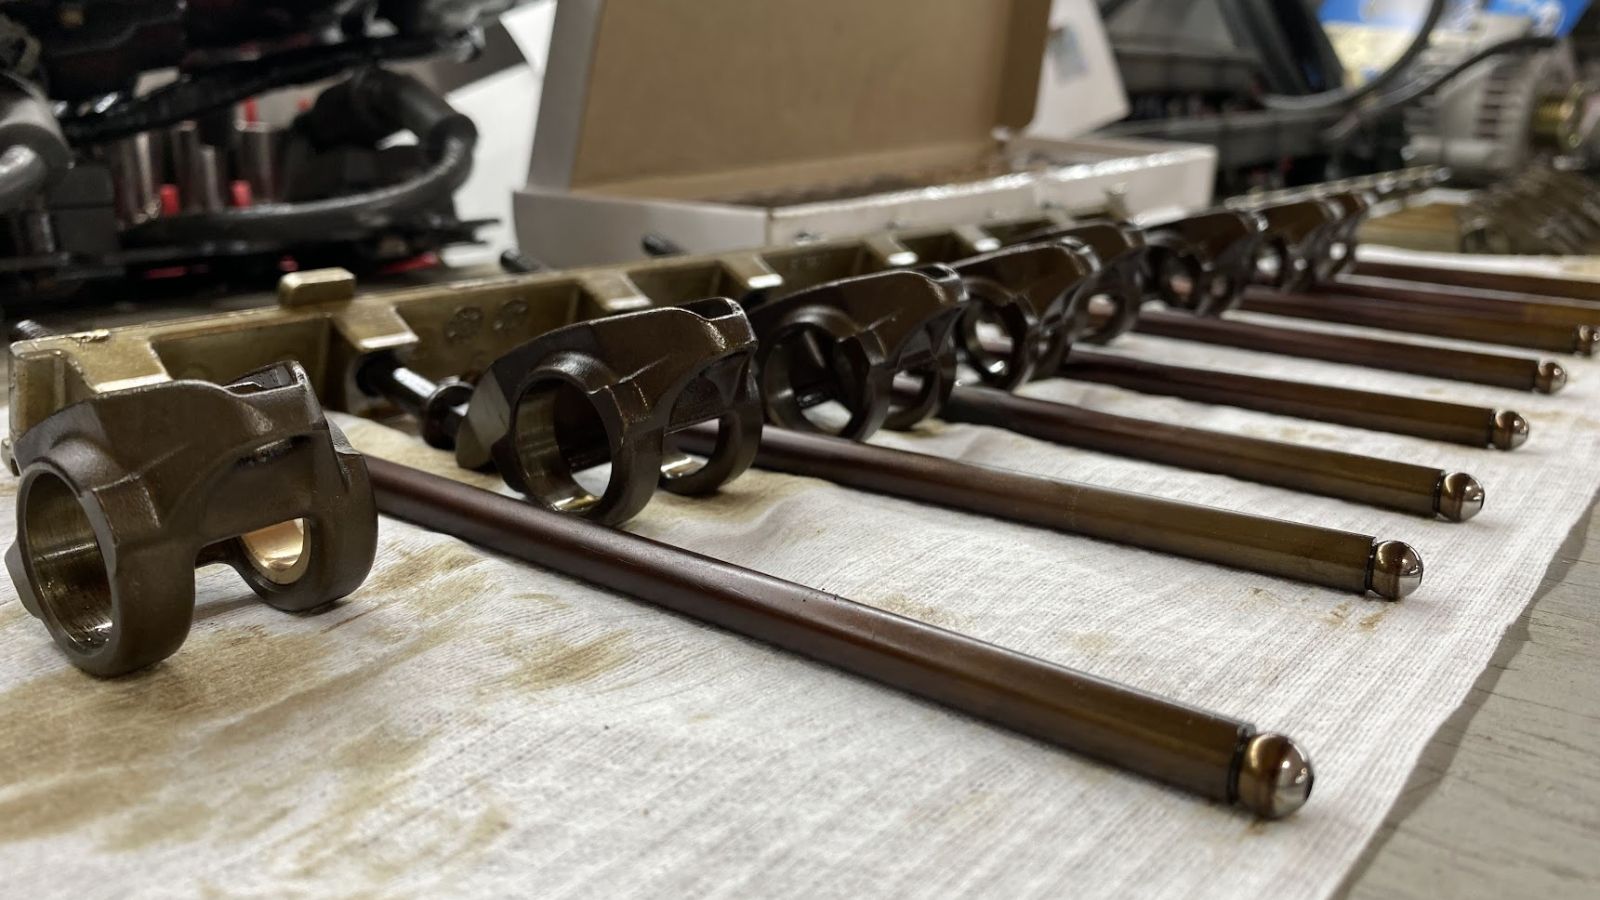
The Fix: Tick Performance Bronze Bushing Kit
There are two approaches to the trunion upgrade. Captured needle bearing kits (like the COMP Cams 13702-KIT) replace the stock bearings with a retained version that can’t walk out. They work. They’re proven.
But Tick Performance took a different approach with their bronze bushing kit.
Instead of better needle bearings, they eliminated needle bearings entirely. The kit replaces the factory trunion and bearings with:
- Micro-polished hardened steel shafts as the new trunion
- C932 bearing bronze bushings pressed into the rocker arm bore
Bronze bushings spread the load over a wider surface area than needle bearings. They have built-in oil channels to keep the rocker lubricated. And there are zero small loose parts that can escape into your engine.
No needles. No cage. No walking. Just a solid bushing on a hardened shaft.
The kit runs $169.99 for all 16 rocker arms. Aftermarket trunion bolts are available at checkout for about $16 extra. You can reuse factory bolts, but they may need some clearancing to fit the new shafts.
What You’ll Need
- Tick Performance Bronze Trunion Kit (TPSBLST-KIT)
- Aftermarket trunion bolts (recommended, available from Tick)
- Rocker arm removal/install press tool (or a bench vise and careful hands)
- Torque wrench (22-24 ft-lbs for the rocker bolts)
- Clean workspace and parts trays
- Shop towels and brake cleaner
The Process: Removal
Check the video above for the full removal walkthrough, but here’s the overview.
Pull the valve covers. Remove the rocker arm bolts and pull each rocker off the trunion. Keep them organized by cylinder so they go back in the same position.
The stock trunion needs to be pressed out of the rocker arm. This is where the press tool earns its keep. You can do it with a vise and a socket as a driver, but a proper press tool makes it cleaner and reduces the chance of damaging the rocker bore.
Once the old trunion is out, clean the bore thoroughly. Brake cleaner, shop towel, inspect for any scoring or damage.
The Process: Install
Press the new bronze bushing into the rocker arm bore. It should be a firm press fit. The oil channel in the bushing needs to align with the oil feed hole in the rocker arm body. Check this before you start pressing.
Slide the new hardened steel shaft through the bushing. It should spin freely with zero play. If it’s tight, check your bushing alignment. If it’s sloppy, something’s wrong with the bore.
Reinstall the rocker arms on the head. Torque the bolts to 22-24 ft-lbs with the lifter on the base circle of the cam (valve fully closed). Work one cylinder at a time and rotate the engine as needed.
Button up the valve covers and you’re done.
The Genuine Geek Take
This is one of those jobs that’s easy to put off because the engine “runs fine.” And it does. Right up until it doesn’t.
The stock trunion design is the single most common LS failure point that isn’t a consumable. It’s not a wear item that’s expected to fail. It’s a design flaw that GM never revised across the entire LS production run.
If you’re building an LS for any kind of performance use, do this upgrade before you button up the valve covers for the first time. If you’re running a stock-cam daily driver with 80k miles on it, this should still be on your short list.
Two hours of work. $170 in parts. Peace of mind that your valvetrain isn’t going to grenade itself on the highway.
Do it now. Not after you find needles in your oil.